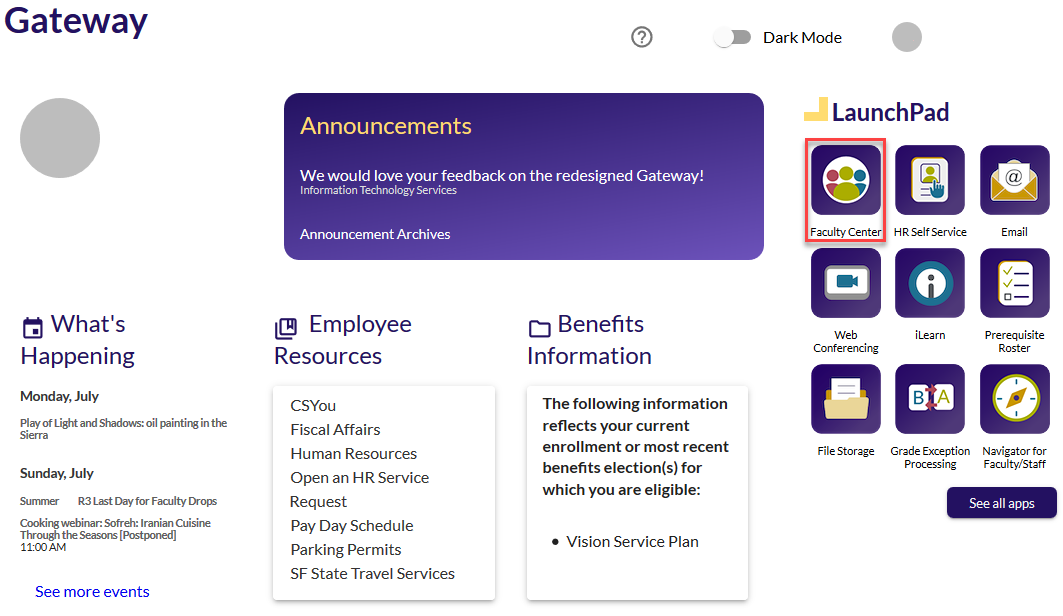
The Faculty Center is the university's website for faculty and staff. The Faculty Center allows faculty and staff to view information such as class rosters, grades, student academic information, and more.
- Log into SF State Gateway
- Navigate to your LaunchPad
- Select the Faculty Center tile
The Faculty Center provides information on your current and past teaching schedules, a list of your classes, your class rosters, the capability to email students, your weekly schedule, and your exam schedule. The following diagram depicts the different sections of the Faculty Center home page:
- My Schedule - Provides a change term button to change the term of the schedule displayed and select a display option to change the mode of the classes displayed
- My Teaching Schedule - Provides a list of the courses you are recorded as the instructor, links to each class to view more class details, class roster (little group of people) icons, and a link to view your weekly teaching schedule
- Class Roster - Allows you to email multiple students
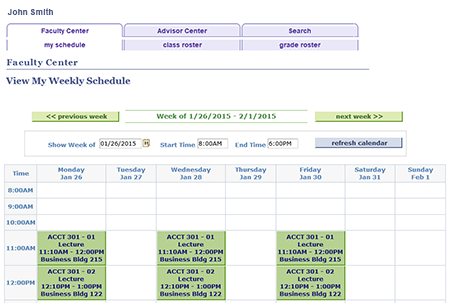
- Weekly Teaching Schedule - Provides a calendar of your teaching schedule and search filters to narrow the calendar to a specific date and time
- My Exam Schedule
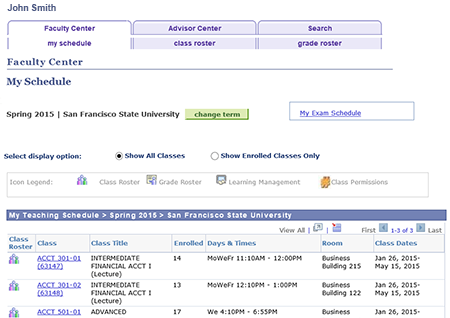
- Log into the Faculty Center
- Select the Faculty Center tab
- Open the my schedule sub-tab
- Click the Change Term button if you wish to view a different term. The My Teaching Schedule section will display all of the instructor's courses
- To view more details about a class section, click the class number link for that section
Note: A graphical teaching schedule is available by clicking the View Weekly Teaching Schedule button at the bottom of the My Teaching Schedule section.
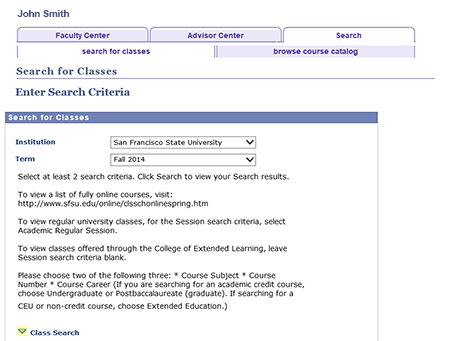
Searching for Classes
- Log into the Faculty Center
- Select the Search tab at the top right
- Open the search for classes sub-tab
- In Term drop-down box, select the correct term
- In the Class Search section, select or enter at least 2 items:
- Session: Select the session type for the class, CEL classes - leave blank, Spring and Fall regular university classes - select Academic Regular Session
- Subject: Select course subject
- Course Number: If the course number is known, select is exactly and enter the exact course number in the provided text box. For GWAR classes, select contains and enter GW in the text box
- Course Career: Select undergraduate, graduate/post-baccalaureate, or extended education (CEL)
- If desired, refine your search using Additional Search Criteria
- Click SEARCH to generate the search results
- If your search returns more that 50 results, you will be prompted to continue. Click OK
- If your search returns more than 300 results, you will have to go back and refine your search
- View the status of the class on the far right in the Status column
- Green circle - Class is open (open seats)
- Blue square - Class is closed (seats filled, waitlist filled)
- Yellow Triangle - Class if full but waitlist is open
- Click on the Class/Course number, located on the far left, to view details of a particular class (e.g., enrollment requirements and open seats)
- To return back to your search results, click the VIEW SEARCH RESULTS button at the bottom
Note: Do not use your browser's back button; it will not take you back to the previous page. - To conduct a new search click the NEW SEARCH button
- To modify your search click the MODIFY SEARCH button
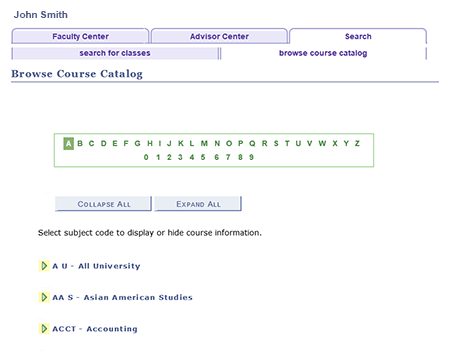
Browsing the Course Catalog
- Log into the Faculty Center
- Select the Search tab at the top right
- Open the browse course catalog sub-tab
- Browse the catalog by using the alphabetical A to Z index
Note: By default you are initially shown the 'A' listing - Select the letter that the desired course begins with (e.g., H for History)
- Find and select the desired subject from the newly displayed list
- Click the triangle next to the subject code, to expand for more information
- Select a course
Note: Selecting a course will allow you to view the course details, enrollment information, and course description. - Click the view class sections button to see if the selected course is being offered for the current term
- Scroll down to view the class sections for the current term
- Use the Terms Offered drop-down box to see the offered courses for the current or other listed terms
- Below the section header, click on the class link in the Section column to view complete details about the course
Note: Complete details include meeting time and location, enrollment requirements, available seats, important notes, a description of the course, and any textbooks or materials. - Once you are finished viewing the class details, click the Return to Browse Course Catalog link below the class description
Note: Do not use your browser's back button; it will not take you back to the previous page. - To view all the subjects, click the EXPAND ALL button below the A-Z index
- To collapse the view, click the COLLAPSE ALL button below the A-Z index
- Log into SF State Gateway
- Navigate to your LaunchPad
- Click the HR Self Service tile
- Select My Personal Information > My Home Address
- Click Edit and make changes
- Click Save
- Select My Personal Information > My Phone Number(s)
- Click Delete to remove a number or Add a Phone Number to add a number
Note: Only one number can be added for each type - Click Save
- Select My Emergency Contacts
- Edit, delete, or add an emergency contact as necessary
Emergency Text Messages (Opt-in)
- Log into SF State Gateway
- Navigate to your LaunchPad
- Click the HR Self Service tile
- Select My Personal Information > My Phone Number(s)
- Click on Add a Phone Number to add a number
- Select Mobile Text and enter your cell phone number to Opt-in
- Save changes
- Log into SF State Gateway
- Click your Name
- Located at the top on smaller screens
- Located in the upper right corner on larger screens
- Click the Update Directory Information link
- Update your First Name, Middle Name, Terminal Degree, Phone, and Location information
For more information, or if you need to update your phone number, please visit ITS Update Directory Information site.