Gator Scheduler can help you find a class schedule that fits your schedule, based on your specific class requirements and your own schedule availability. And, if you are using Degree Planner, you can click the “Gator Scheduler” button to import your semester course plan directly into Gator Scheduler!
Below are detailed instructions for using Gator Scheduler. You can also view our Video Guide, and our Quick Reference Guide.
- Login to the Student Center
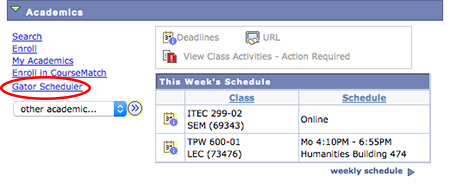
- Click the Gator Scheduler link in the Academics section
- On the Gator Scheduler Launch page, click the green button labeled CLICK HERE (tool tip reads Launch College Scheduler). Students will arrive to a site called College Scheduler
Note: The Gator Scheduler is a pop-up window, so students need to have their pop-up blocker disabled, for the Gator Scheduler to open. Leave the Gator Scheduler Launch page open, to enroll in classes later. - Select the desired academic term
- Select the desired academic session(s)
Note: College of Extended Learning (CEL students), select the CEL session(s) that apply to you. - Click Save and Continue
- Select your academic career(s)
- Click Save and Continue
Note: Some sections only appear when they have content.
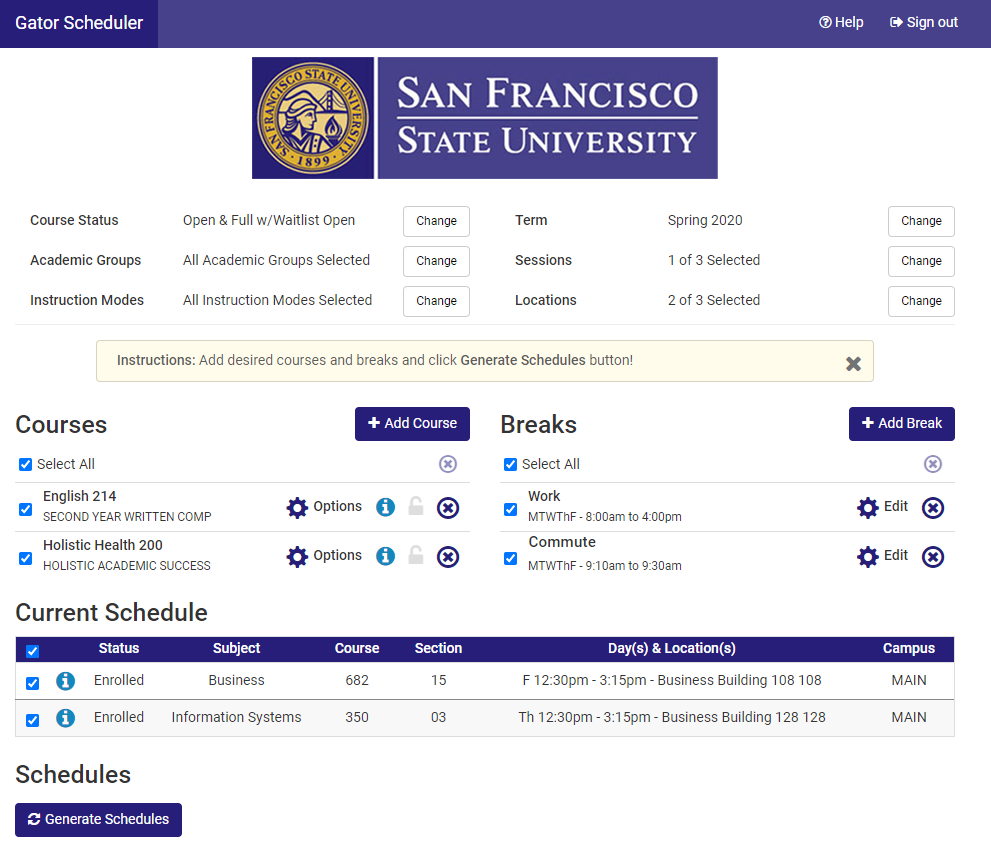
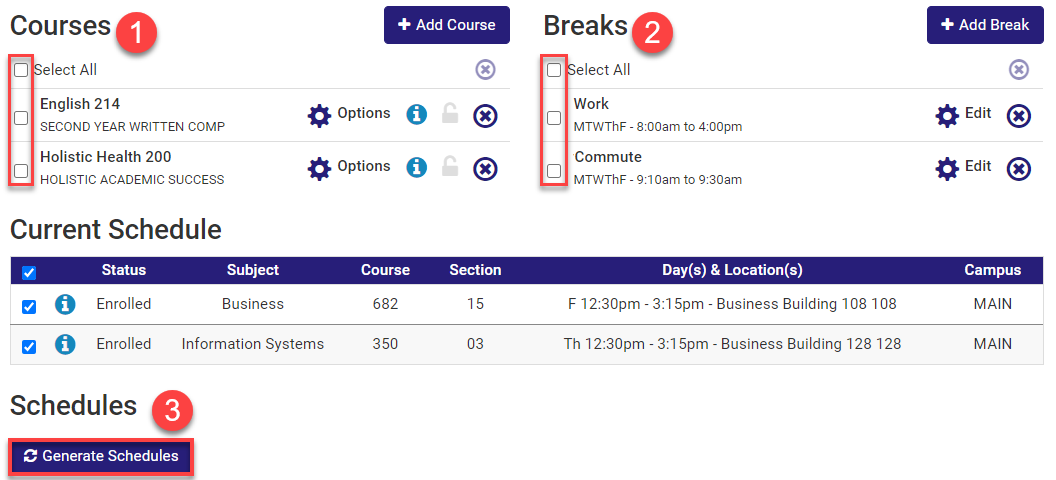
- Search Criteria Section: Allows students to search for specific classes (e.g., online classes)
- Courses Section: Allows students to create a list of the classes they would like to fit in their schedule and view/edit the classes
- Breaks Section: Allows students to block off days and times they cannot take classes (e.g., work)
- Current Schedule Section: Displays the classes a student is currently enrolled in
- Schedule Section: Allows students to generate and compare schedules
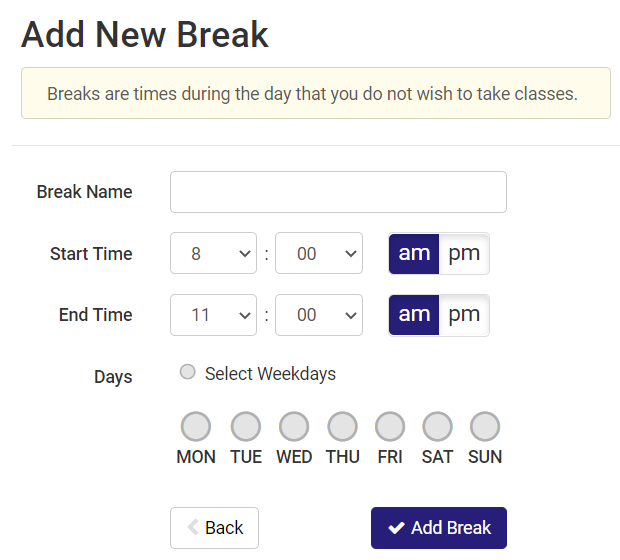
- Click the Add Break button in the Breaks section
- Provide a break name in the Break Name text box
- Select a start and end time for your break, using the drop-down boxes
- Select the day(s) that your break will be on (the days that you do not wish to take classes) by checking the boxes
- Click the Add Break button
- Repeat this process to add more breaks
- Change the options in the search criteria, at the top of the Gator Scheduler, based on desirability. The search criteria consists of six drop-down boxes:

- Course Status
- Open Classes Only
- Open & Full w/Waitlist Open
- Open & Full
- Academic Group
- All Groups Selected
- Change Academic Groups (All Groups Selected, All University, Business, CEL - Academic Credit, CEL - Non Academic Credit, Ethnic Studies, Graduate College Of Education, Health And Social Sciences, Liberal & Creative Arts, Science And Engineering)
- Instruction Mode
- All Modes Selected
- Change Mode Options (All Modes Selected, In Person, Online)
- Term
- Previous semester (e.g., Fall 2014)
- Current semester (e.g., Spring 2015)
- Sessions
- Displays the number of selected sessions out of the total of offered sessions (e.g., 1 of 3 Selected)
- Change Session Options (All Sessions Selected, Academic Regular Session, CEL Academic Credit Session, CEL Non Credit Session)
- Location
- All Locations Selected
- Change locations (All Locations Selected, Downtown, On Campus, Online)
All Classes
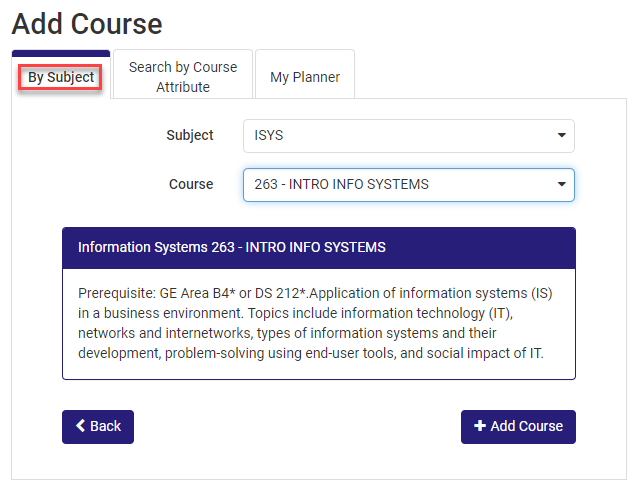
- Click the Add Course button in the Courses section. Students will arrive to the default search, Search By Subject And Course
- Select a subject to search
- Select a course to search. A brief description of the class will appear below
- Review the description to make sure the class is the desired class and that prerequisites are met
- Click the Add Course button to add the class to your schedule
- Repeat this process to add more classes
Note: If student's add a class in which prerequisites have not been met, they will not be able to enroll for the class, later in their shopping cart. Also, students should remember that their search are generated from the search criteria they have selected and that they can make changes to the search criteria at any time.
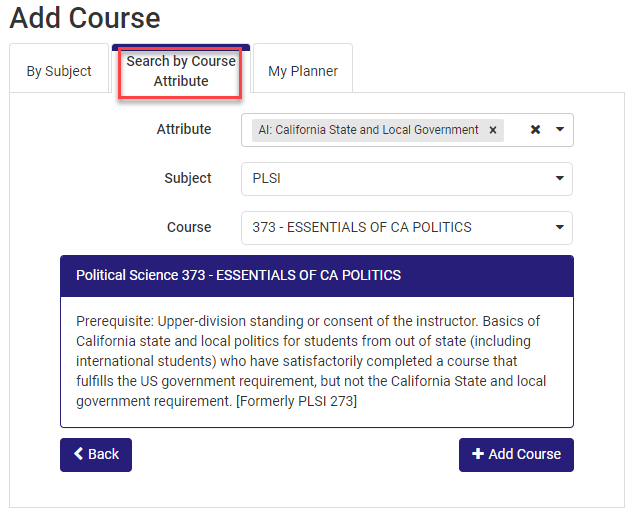
GE & University Required Classes
- Click the Add Course button
- Click the Search By Course Attribute tab
- Select an attribute to search
- Select a subject to search
- Select a course to search. A brief description of the class will appear below
- Review the description to make sure the class is the desired class and that prerequisites are met
- Click the Add Course button to add the class to your schedule
- Repeat this process to add more GE Required classes
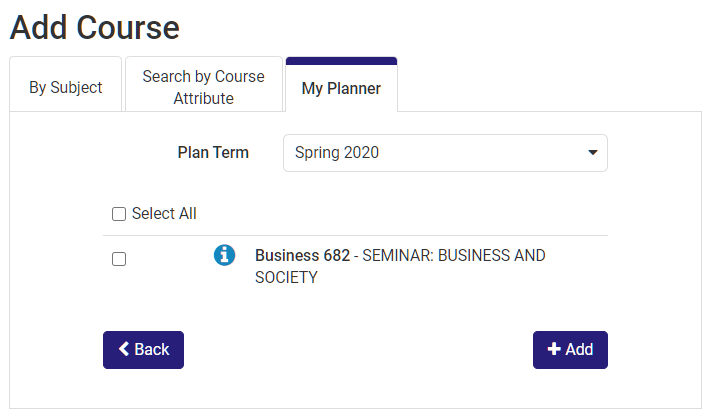
Degree Planner Classes
- Click the Add Course button
- Click the My Planner tab
- Select the correct semester from the Plan Term menu
- Select the courses determined by your degree planner.
- Click the Add Course button to add the class to your schedule
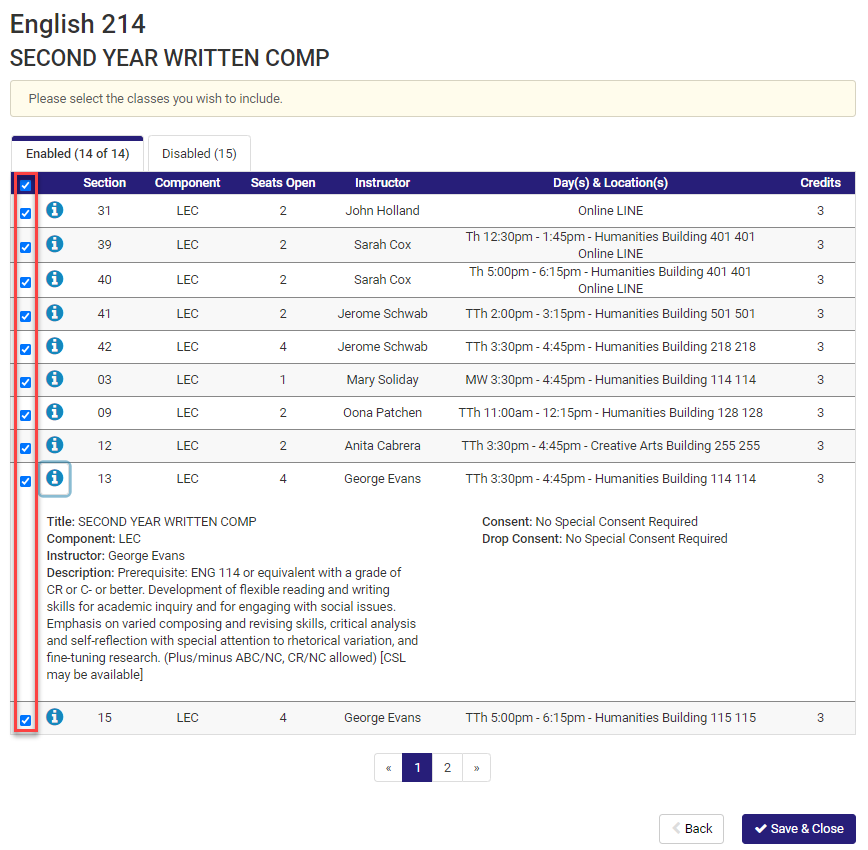
- Click View/Edit in the Options column in the Courses section to view a specific class
- All of the classes offered for that specific class will be checked by default. Uncheck any of the classes that do not work with your schedule. If all the classes work with your schedule, leave them all checked
Note: If the course status selected in the search criteria is Open Classes Only, an option called Disabled Option might be visible at the bottom, when viewing/editing your classes. The Disabled Option displays the closed classes for the class you added and are viewing. - Click the Info icon (inside View/Edit) for all the class details
Note: The Info icon on the Courses section only provides the title and description of the class - Click the Save and Close button
- To drop a class, click the encircled x icon on the far right of the Courses sectio
The Gator Scheduler will generate class schedules for students based off of the classes and breaks they have added, their current class schedule, and the classes in their shopping cart. The number of schedules generated for each student will vary. For example, the Gator Scheduler may generate 500 schedules for one student, 10 schedules for another, or one schedule for one student. The schedule generating tool is dependent on many factors, such as a student's availability, the available classes for a given class, and the class status.
- Check all the boxes next to your classes in the Courses section
- Check all the boxes next to your breaks in the Breaks section
- Click the Generate Schedules button in the Schedule section. A table displaying a few options and a list of your added classes will emerge
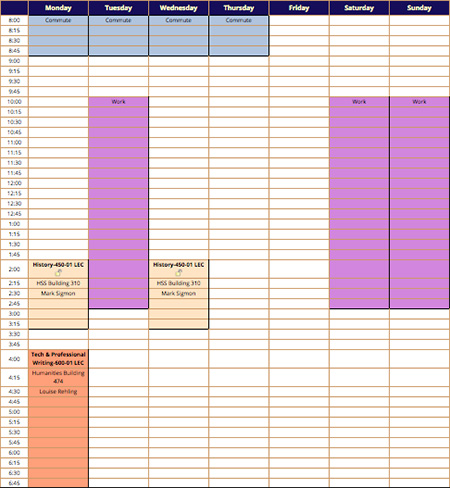
Note: An error message will appear, if your added classes or breaks conflict with the classes in your current schedule or shopping cart. If this happens, review your added classes and breaks and remove any that conflict. If you uncheck any of the classes in your current schedule or shopping cart, you are giving Gator Scheduler permission to create schedules that conflict with your current class schedule and shopping cart. - Click the View option in the table to view a specific schedule. A pop-up window will display the schedule
- Click the Close Schedule button (top of page) to exit the schedule view
- After you have left the schedule view, you can select another schedule to view
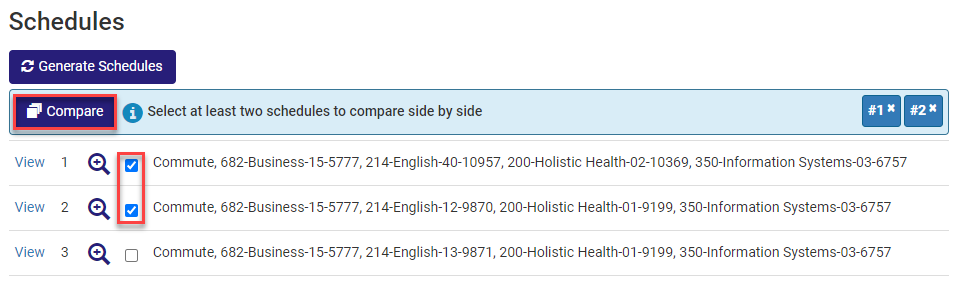
If more than one schedule was generated, the schedules can be compared. Up to four schedules can be compared at a time.
- Check the boxes of the schedules that you want to compare in the Schedule section
- Click the Compare button that emerges above when you start checking the boxes. A visual representation of the selected schedules will emerge
- Open one of the schedules for a closer look. A pop-up window will display the schedule
- Click the Close Schedule button to exit the schedule view
- Open another schedule to compare
- Click the lock icon, in front of the class information in the schedule view, if a class you added is offered on a specific day and time you want. The Gator Scheduler will then only generate schedules with that class locked in placed for that specific day and time.
- Click the Close Compare button to exit the compare view
- If you locked a class, a confirmation screen will pop up. Click Ok
Note: A lock will decrease the number of schedules generated. To remove a lock, go to the Courses section and click on the lock icon. On the pop-up confirmation screen, click OK
- Generate your schedule
- Click the View option for the desired schedule. A pop-up window will display the schedule
- Click the Send Schedule to Shopping Cart button (top of page)
- On the pop-up confirmation screen, click OK
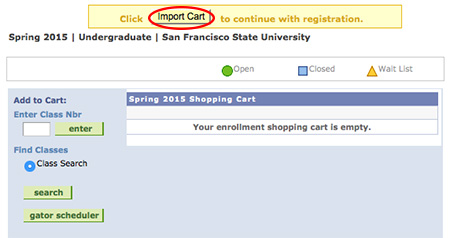
Note: Continuing to your enrollment shopping cart will close the Gator Scheduler - Click the Close button, in the window that pops up, after you have sent your schedule to your shopping cart
- Go back to the Gator Scheduler Launch window (the window started on)
Note: If you closed the Gator Scheduler Launch window, follow these two additional steps, then go to step 8 and proceed with the remaining instructions:- Go to the Student Center
- Click the Enroll link in the Academics section
- Click the green button labeled COURSE ENROLLMENT
- You must wait until your Priority Registration Appointment begins for these following steps.
- Click the yellow button, inside the yellow rectangular box, labeled Import Cart
- Click the green button labeled NEXT
- Click the green button labeled PROCEED TO STEP 2 OF 3
- Click the green button labeled FINISH ENROLLING